Aug 5, 2025
Vibe Designing with AI from an existing design

Founder of Design with AI
I’ve been seeing a lot about Magic Patterns lately 👀
So I asked Xinran Ma to walk us through how he uses the product and he agreed!
It’s a super practical guide that I think you’ll really like.
I particularly enjoy how he focuses on starting from an existing design vs. a blank canvas (that’s my use case most of the time).
And if you want to learn more about how AI can be a competitive advantage in your career, Xinran’s “AI for Product Designers” has quickly become one of the most popular courses on Maven.

You can use this link to get $100 off before the next cohort starts.
Ok now I’ll turn it over to Xinran 👇
Vibe Designing with AI from an existing design
A lot of AI use cases online in product design are about going from 0 to 1.
They used a prompt to generate a quick design or prototype.
But what if we didn’t want to start from scratch?
What if we could use AI without a specific instruction, and “vibe design” from there?
After all, in day-to-day work, we rarely need to generate a blue-sky vision from scratch using a super specific prompt. More often, we need to ideate, refine, and iterate on what already exists.
In today’s newsletter, I’ll walk you through a case study on how I brainstormed design ideas starting from an existing design.
I went with the flow, without giving the AI detailed instructions upfront.
Let’s get started.
Overview
This is an overview of the process for this case study.
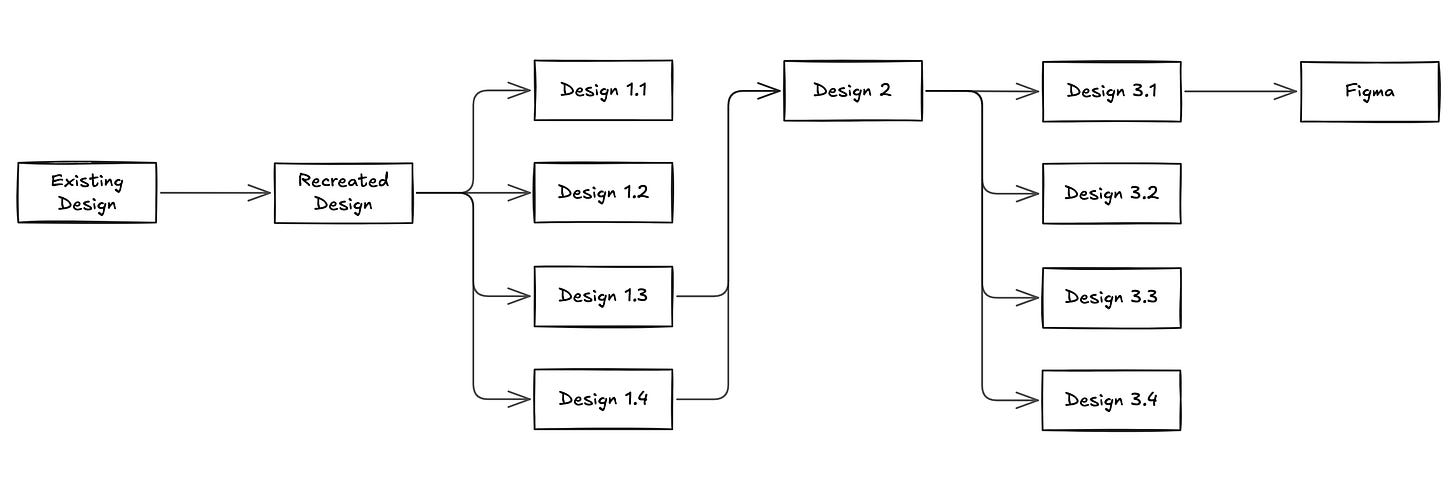
An overview of how the case study progressed
I used Magic Patterns for this case study because it offers three features that fit my use case well:
The /Inspiration feature, which can generate four design options at once.
The Canvas feature, which supports collaboration and helps track design explorations more effectively.
The Export to Figma feature, which allows me to further revise in Figma after “vibe designing”.
To keep this article focused, I’ll cover how to effectively use the Canvas feature in a separate article.
I’ve also tried tools like V0 and Lovable for this use case, but I found it difficult to navigate the design options and organize my progress without the features mentioned above.
Step 1: Recreate the design
This step is to create a baseline so that I can use AI to iterate from there.
There are two ways to “recreate” the existing design.
Option 1
Take a snapshot of the existing design or export it to an image and attach in Magic Patterns. Then ask a simple prompt like “recreate this as accurately as possible” or “clone this”.
This is the easiest, fastest, most common way.
Not as accurate as Option 2.
Option 2
Use Magic Patterns’s chrome extension to help recreate the existing design.
The prerequisite is the existing design needs to be on a live site.
It can be time-consuming, as it often converts one div block at a time.
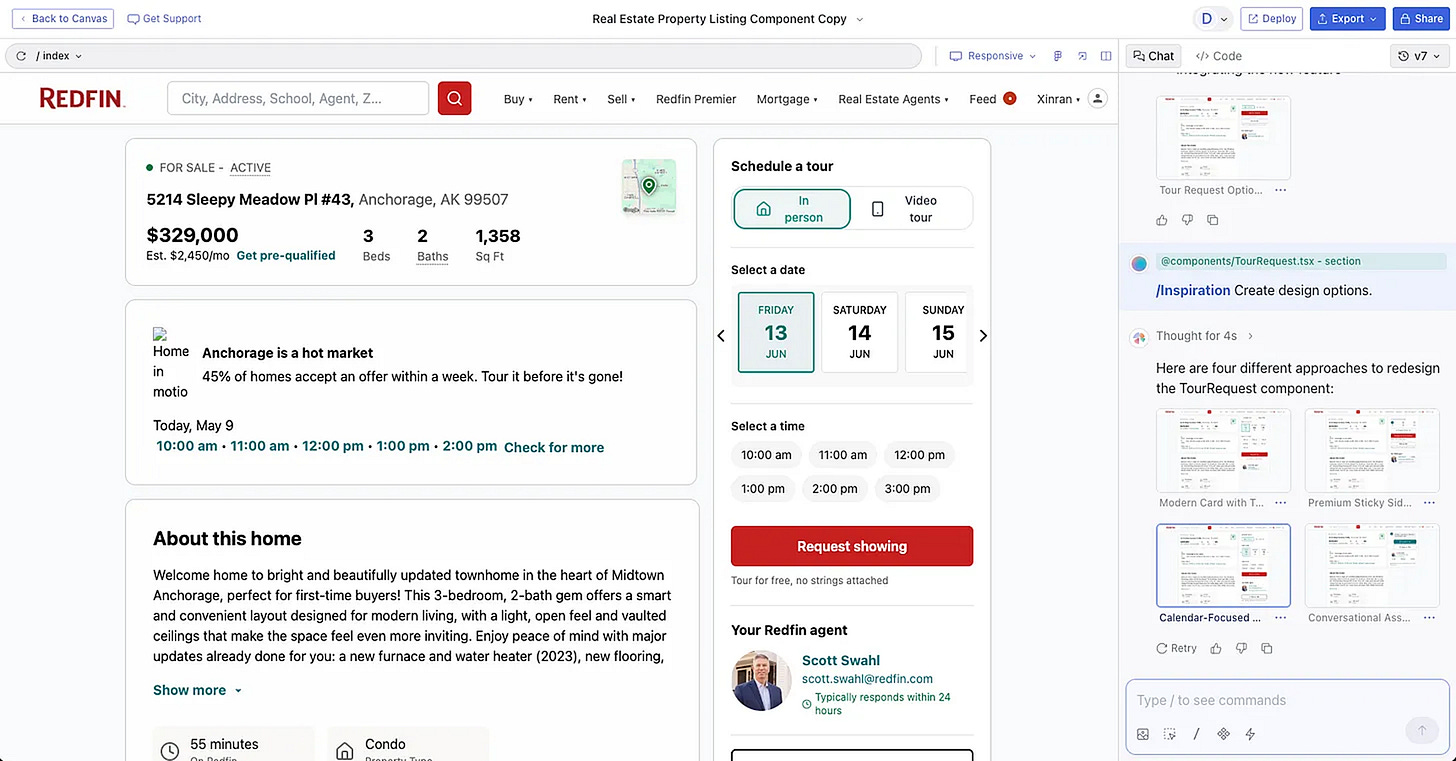
In this case, I used a random house detail page on Redfin as an example via Option 2.
Here’s the result:
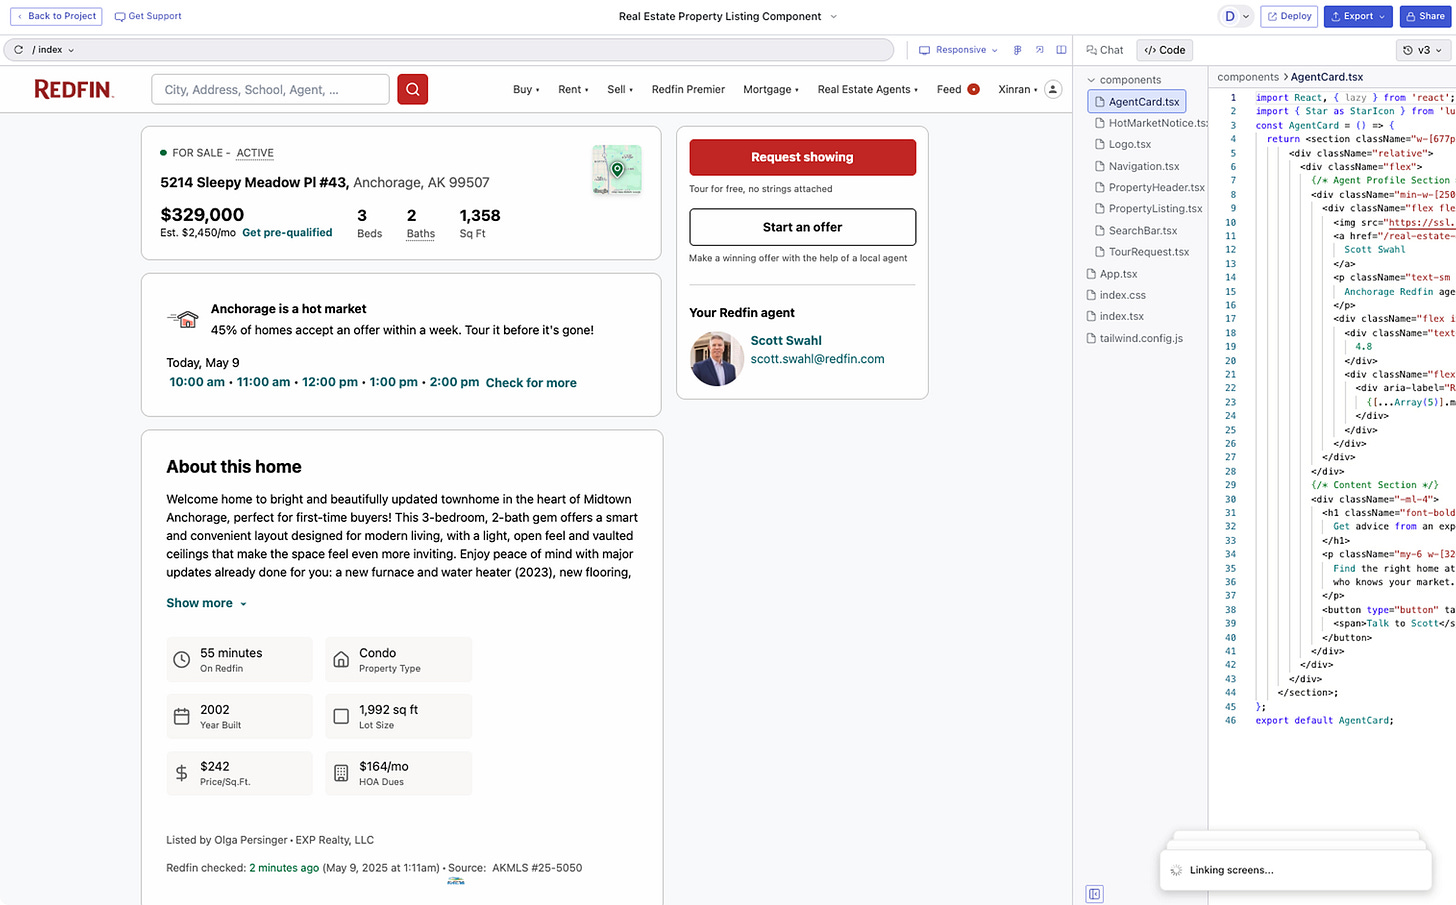
The recreated design in Magic Patterns looked 95% close to the live webpage after I made some tweaks.
Note
Actually, this step doesn’t have to be a separate step. Because if I were to attach a snapshot of the existing design and provide a prompt, Magic Patterns would automatically generate components (backed by real code) to match the snapshot, just like other similar AI tools such as V0, Lovable, and Bolt.
But I like to treat this as a separate step as a checkpoint. I want to ensure the design is recreated accurately enough and feel satisfied with the result before moving on to iterations. The level of accuracy you aim for really depends on your needs.
Step 2: Pick an area for brainstorming
I often like to narrow down the scope when brainstorming, just to stay focused.
Because when you provide AI with too much context to work with, it can struggle to perform well and consume a lot of unnecessary tokens.
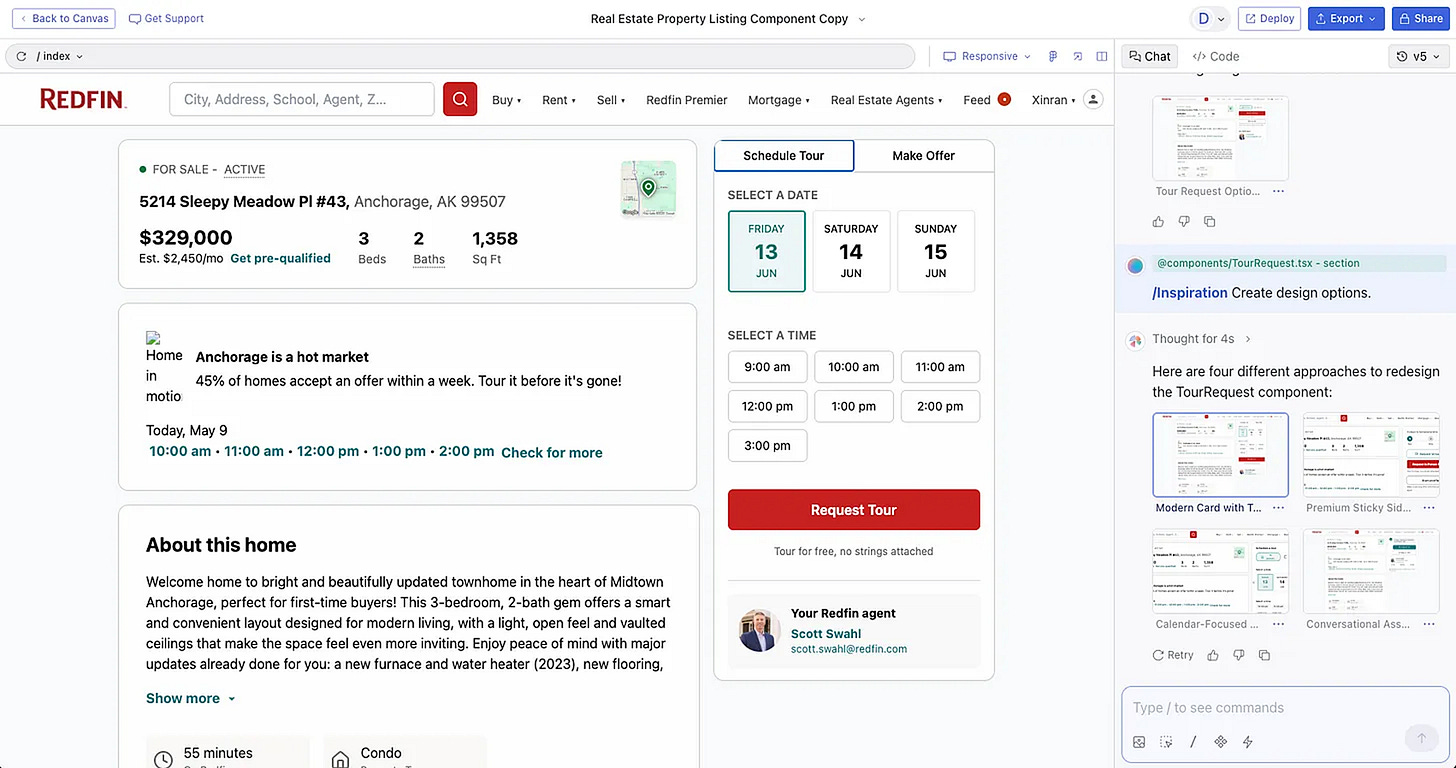
So, I used the “Select” feature to select the specific area I wanted to brainstorm on and clicked “Add to Chat”. (This feature is common in many AI tools. It helps narrow the context so the AI focuses only on the selected area.)
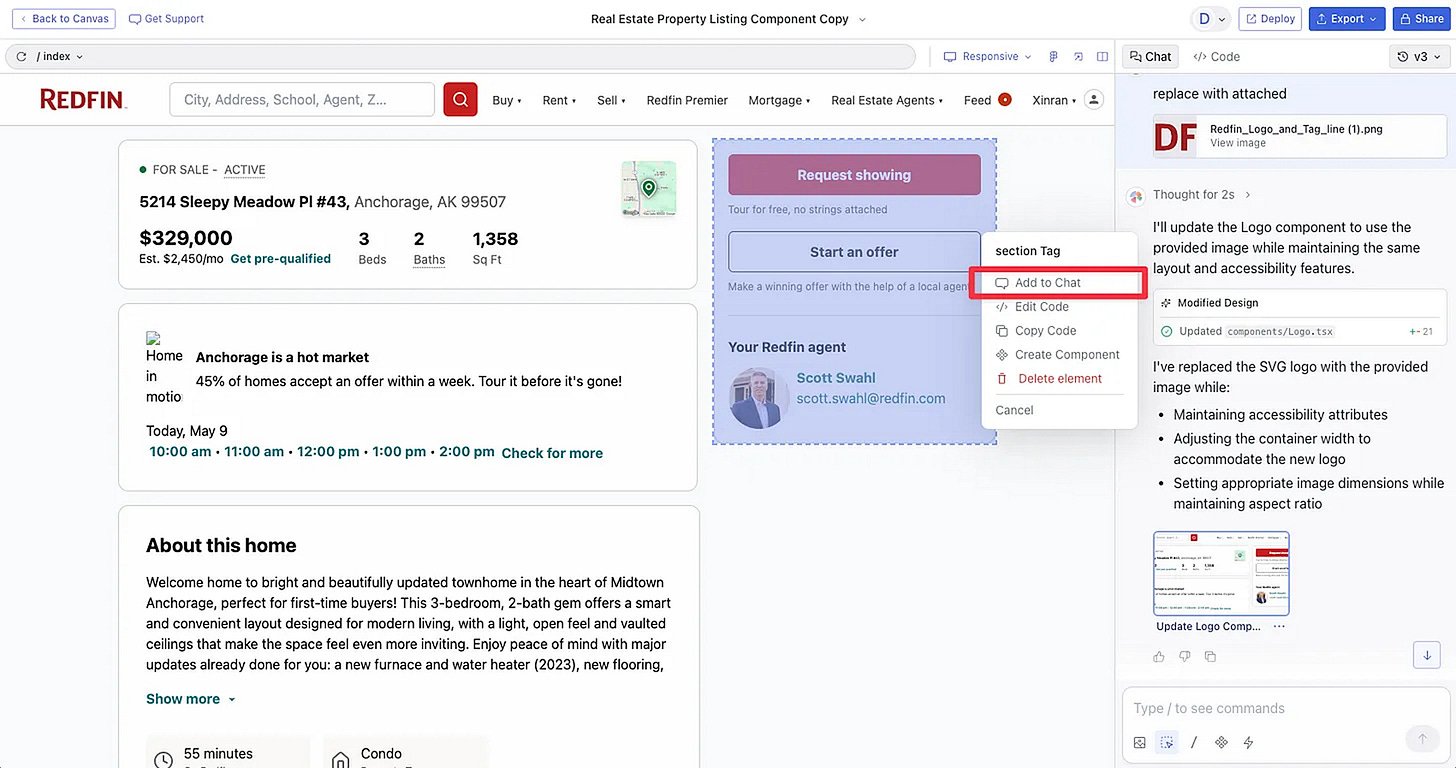
After “adding to chat”, you can see the “@xxxxxx” in the chat window. It means it will only use that area/block/section as the target context to change code.
Then I wrote this simple prompt in the chat window:
“/inspiration” is just a preset command in Magic Patterns that means “Create 4 design options”, so technically I don’t even have to write “Create design options” again.
I could also have provided more specific instructions here, such as context, goals, etc., but I didn’t do so for this case study because we’re talking about “vibe designing” :)
The point of “vibe designing” is not to be too prescriptive at the beginning. It’s about letting AI show what it can do first, then going deeper or pivoting from there.
Step 3: Review design options
It generated four design options in less than a minute. You can see the preview of them in the chat window.
It even automatically provides a name for each option.
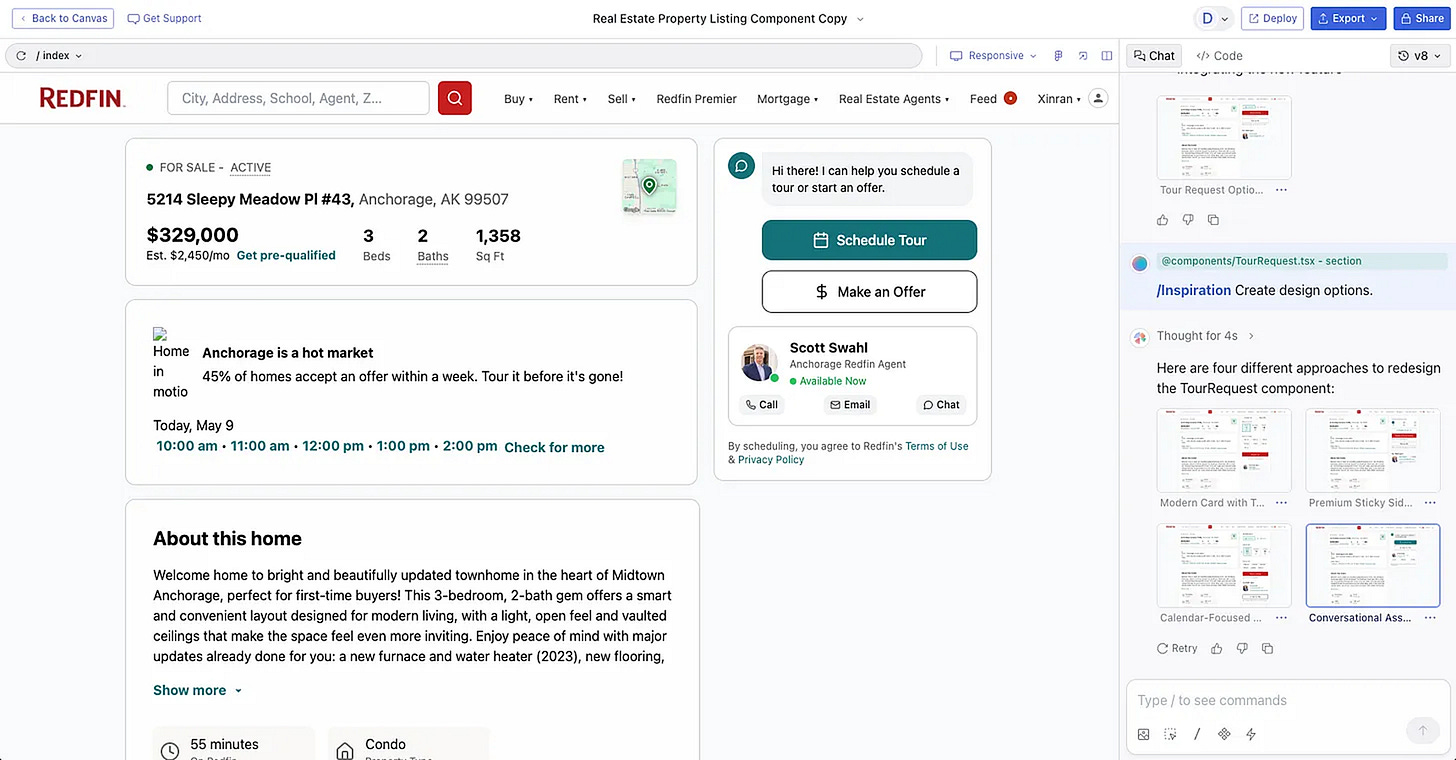
Design Option 1
It shows the time tiles and put “Make Offer” into a new tab.
Design Option 2
It shows “3 steps to homeownership” and add a new CTA for Virtual Tour.

Design Option 3
It puts the In-person Tour option and the Video Tour option into a toggle.
Design Option 4
It shows an AI Chat interface, as well as a new agent card design.
As you can see, each option has pros and cons. Not every one makes sense.
If I am not happy with any of the 4 options, I can just click “Retry” and it will generate another 4 options for me.
If I am interested in one of the options, I can go deeper with follow-up prompts.
Alternatively, I can also mix and match them, which brings us to Step 4.
Step 4: Mix-match design options
This step is optional. (Well, in “vibe designing”, there’s no step is not optional.)
Let’s say you liked some parts of Design Option 3 and a part of Design Option 4, you can ask it to mix-match.
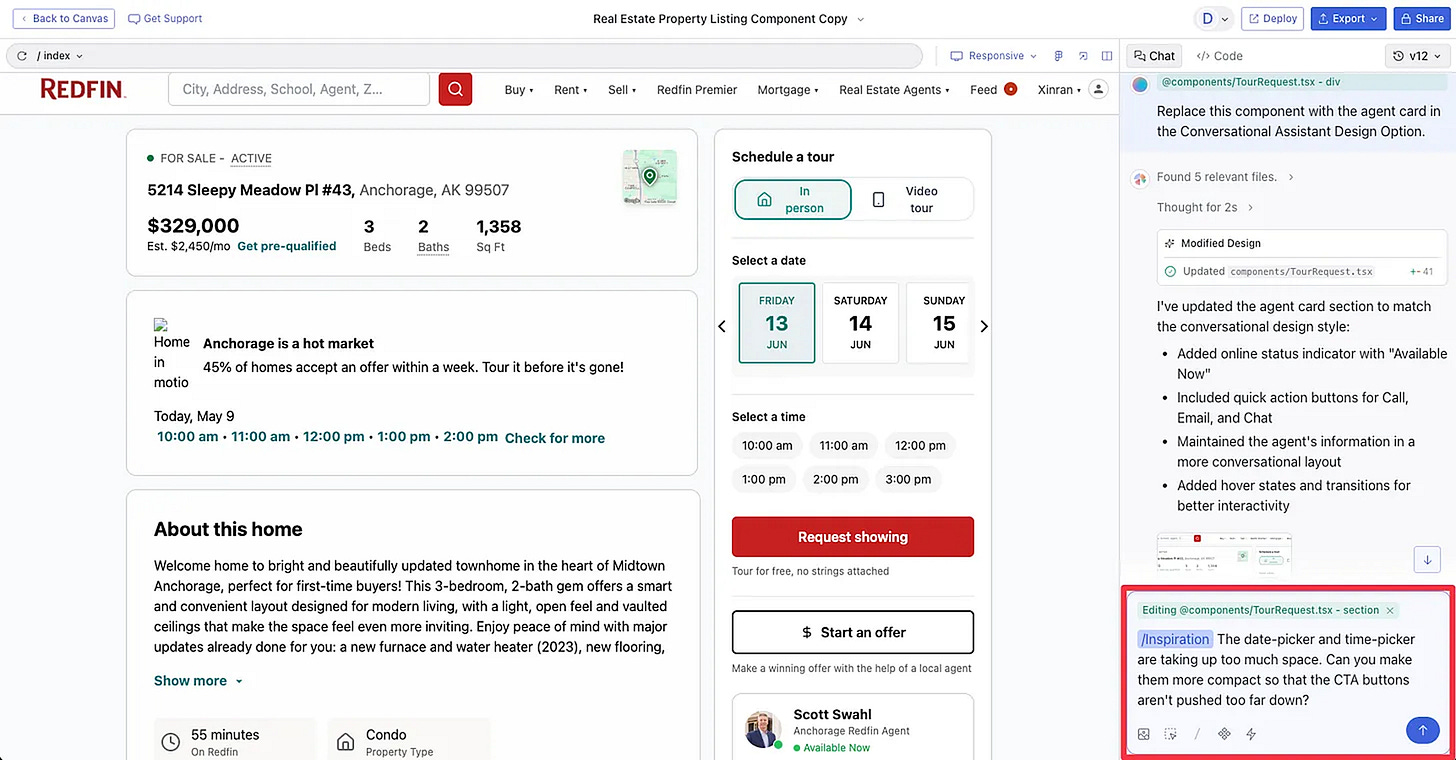
I used the “Select” tool to select a component in Design Option 3 and asked:
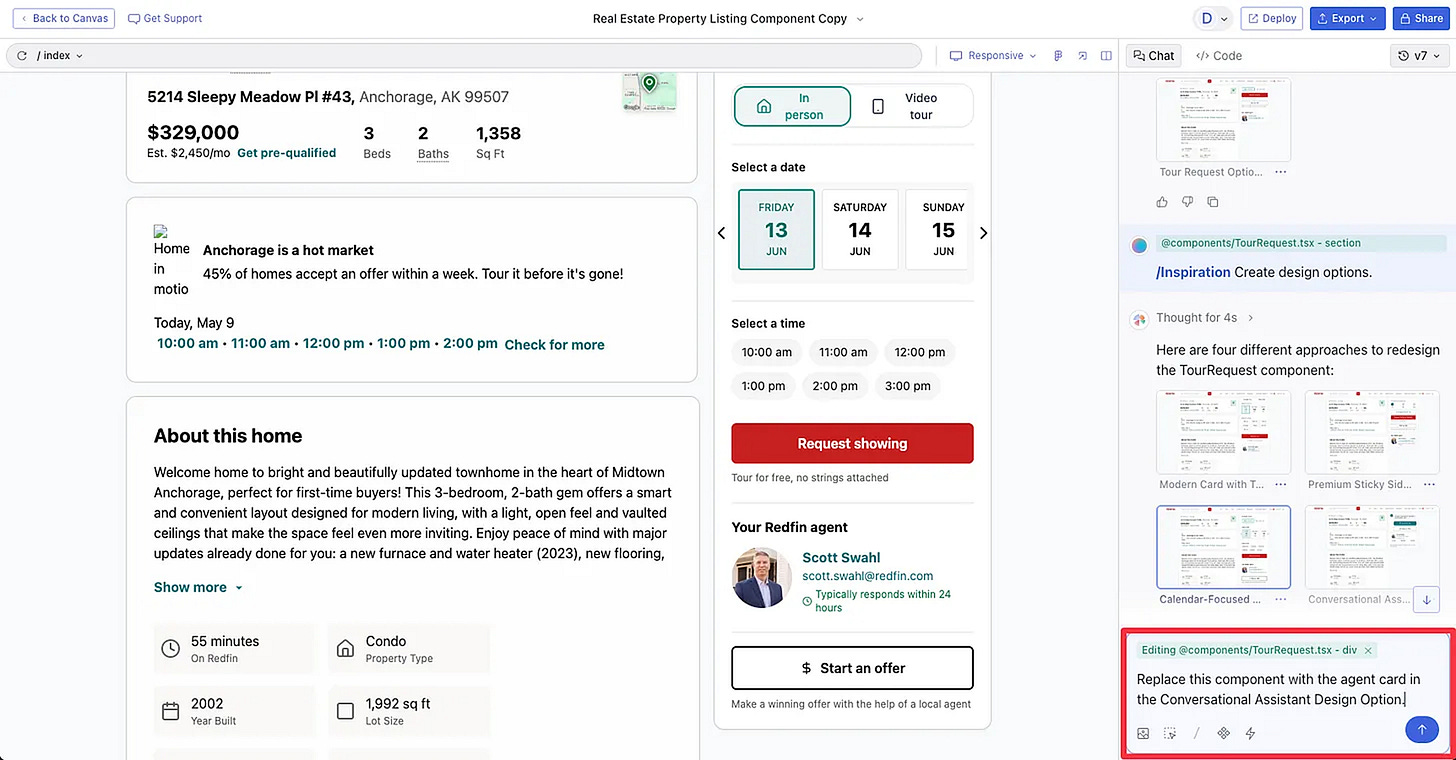
Ask to mix-match two design options
Here’s the result:
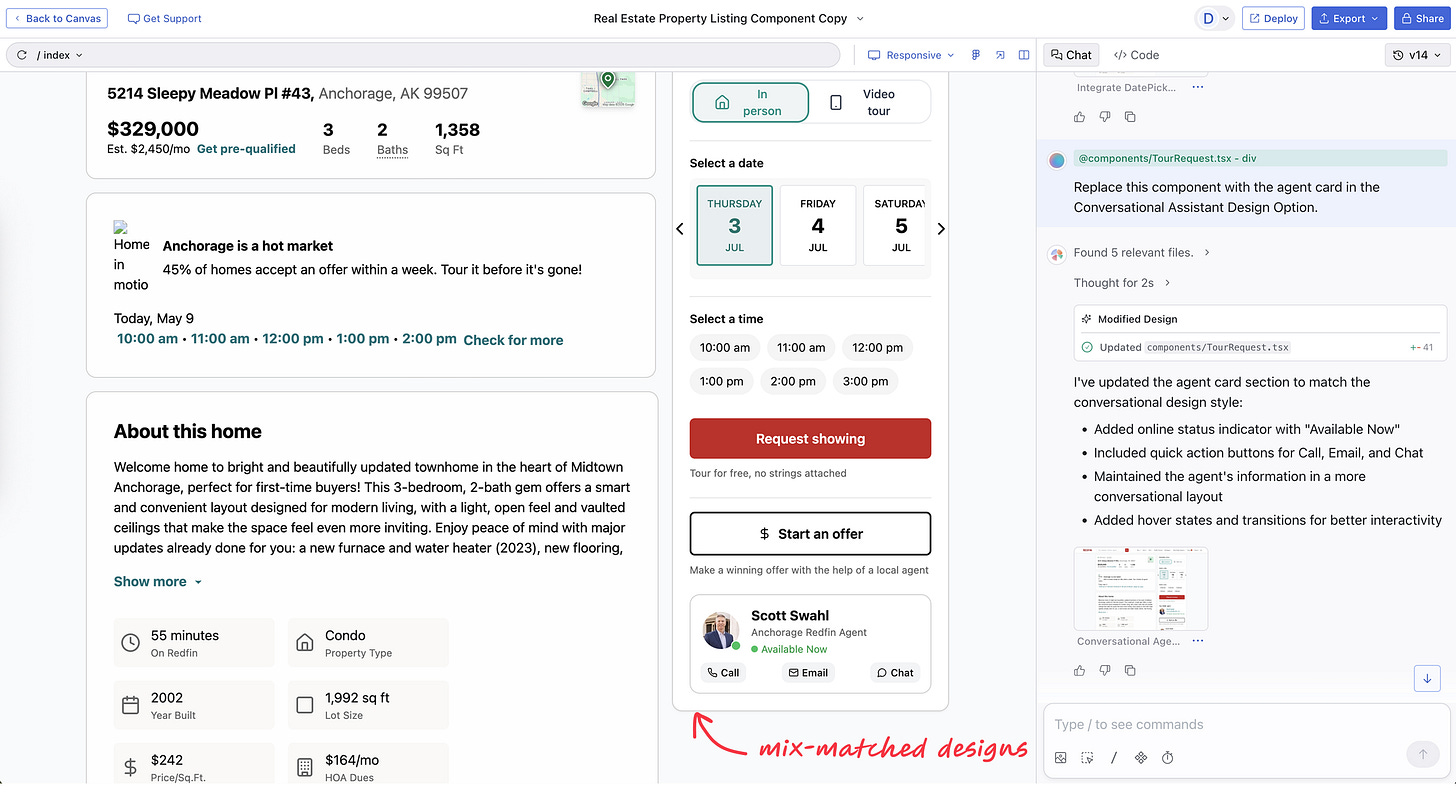
The result after mix-matching
It essentially plugged the agent card component from Design Option 4 into Option 3. Then I made a tiny edit to move it below the “Start an offer” button.
Step 5: Refine the design
There are many refinements I could make, but for the sake of this demo, I kept it simple—used the “Select” tool to select the whole right section of the page and asked:
Ask to refine the design with a specific request
Here’s the result. It generated 4 design options to tackle the problem I mentioned in the prompt:
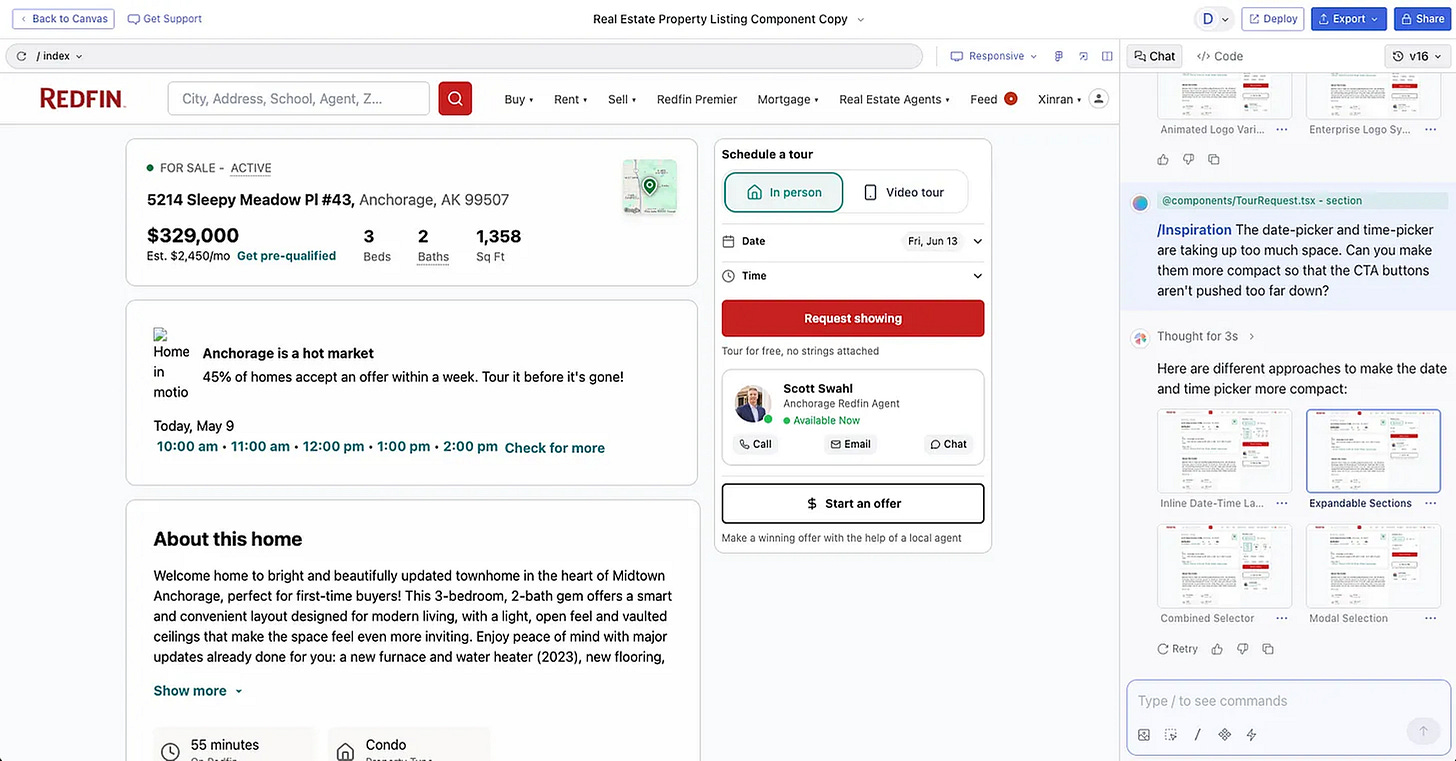
Four options generated to improve the design
I can keep revising or brainstorming from there.
If I’m relatively satisfied with one or more designs, I can easily export the design to Figma for further editing using its Figma Export feature.
This article was originally posted on Substack by Xinran Ma
Go deeper…


hello@dive.club
Ⓒ Dive 2026